Showing posts with label Embroidery Club. Show all posts

Thursday, January 15, 2015

Zippered Little Christmas Bag

Still sewing Christmas projects at Embroidery Club this month.

What can I say…I love Christmas!

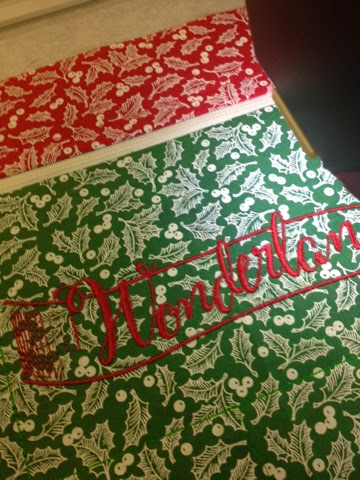
This is a zippered bag (an Anita Goodesign pattern) that can be completely sewn in-the-hoop!

And the design graphic and lettering can be changed easily to another holiday or event if you have embroidery software.


I love the holly fabric in red and green.

The back of the bag is in the red holly fabric.


Here you can see me stitching it out in the hoop.

The zipper is already done.


The only stitching done out of the hoop is sewing it together.


I can't wait to sew up some more of these cute little bags.

The pattern comes in three sizes too.

This is the smallest size.

I just may make several of these for Christmas this year for the girls in my family.

Anita Goodesign's collection also included a zippered Sewing Blackboard Bag (video here).

Watch the video it is so neat to see this little bag sewn in-the-hoop.

Since I used fabric instead of felt I had to double the fabric on the front and back and fold over at the zipper so no raw edges showed.  

I am having so much fun machine embroidering!

Thanks for visiting!


Sunday, October 12, 2014

Hello Fall and More

I love my little chalkboard sign!  


Today I updated it for Autumn.  

Lately, rather than using the chalkboard ink pencils, I've been using regular chalk. 

Click (here) to read about making my cheap and easy chalkboard sign. 


After we move to our new home in Ohio I'm going to make some more of them.  

I just read someone's blog where they said chalkboards are "out" now.  

Although the blogger didn't agree (and I don't agree either) because she (and I) loved her (my) chalkboards too.


I'm not able to post as much lately because I've been so busy de-cluttering, cleaning, organizing and packing for our move (still several months away).  

We have rented two storage units... one in PA and another in OH.

And they are filling up.
  

I'm packing my collections and knickknacks for our next trip to our OH storage.

Yesterday I tackled our bathrooms.  

My goodness I couldn't believe all the stuff I had "stuffed" into those rooms.  

I was going to take some before photos of all of it laid out on my beds to sort through but I was too embrassed.  


Today I'm going to go through all my jewelry.  

That is…I'm going to start to sort through it all.

I got as far as gathering it all together and laying it out on our guest bed. 

Not that I wear a lot of jewelry but I have inherited my Mom's and some of my Mother-in-law's jewelry.  


Last week I embroidered the cutest Santa Claus postcard at our monthly Embroidery Club.  

It's embroidered/appliqued out of fabric and felt.  


I purchased this design as part of a set, In-The-Hoop Christmas Postcards (here), on-line at Embroidery Library.

 I'm definitely going to make some more. 


I finished crocheting my Christmas Star Coasters.


 I made enough for our neighborhood Bunco Christmas Party in December.

Next I have to block and starch all of them. 


While packing I found these cute Halloween mugs to set out on our fireplace mantel. 


And last week I bought some Halloween/Fall fat quarters in the neatest fabrics.  


My brother's Maple Tree changing colors in Ohio.

October is such a beautiful month! 

Thanks for visiting. 


Sunday, August 3, 2014

My Lace Christmas Tree

My Lace Christmas Tree

One thing I like about my sewing store's monthly Embroidery Club is the instructors are always having us try new techniques.  

Stitching out one of the interior lace panels.

This project was spread out over the summer months and now I know why.  

It's because it took FOREVER to stitch out.  
 
It wasn't difficult to do because there is no changing of thread and the machine does all the work... but to stitch out all the parts took between five to six hours.

So while the machine is stitching away I do other things in my sewing/craft room. 

The design lace pattern.

I swore during the put-together stage I would NEVER do another one.  

Manually attaching all the tiny button and/or loops was a pain.  

And it wasn't until almost the last ones that I figured out an easier way to do it. 

Errrr…. 

One of six interior panels.

This is stitched directly onto the wash away stabilizer.

See the tiny buttons and loops on the sides! 

Now that it is finished I love it!  

It glows so beautifully when a multi-colored battery light is placed inside the tree. 

Love my TruEmbroidery Software.

I was able to combine all 18 appliqués into one hoop.

The white organza (semi-sheer) fabric is lovely appliquéd on the exterior lace panels.

This little tree will go beautifully with my Department 56 White Christmas village.  

Six inside panels and 18 fabric appliquéd exterior panels plus an angel topper and ice pond.

I bought green organza (semi-sheer) fabric and thread to sew a green tree too...someday.  

All attached except the last side.


There's a whole village set to this collection.  

Maybe if I do one a year...?

Tools to attached the pieces..safety pin and tweezers.


And did I mention it takes a lot of thread!  

I use up a brand new large spool of white thread and GUESS WHAT...there are different shades of white thread!  

I have a two-tone white threaded tree because I didn't realize this.  

LOL!


I'm sitting with a heat pad to my upper back as I type this.  

I pulled a muscle in bed this morning and I swear I barely moved when it happened.

Oh, by the way, I finished my "Party with Patrick" wall hanging, "Ho, Ho, Ho…" and will post it soon.

I'm crocheting quite a bit in the evenings now to work on my "Breezy Begonia" throw.

Now to think about how I want to join the squares.

Life is tough when one is retired!

I love having endless "play" time again!  


Thursday, May 8, 2014

My Poinsettia Cross-Stitch

We did something new in Embroidery Club last Monday...machine embroidery cross stitch.

Many years ago I hand-crossed stitched two little projects.

They were cute but it took forever to hand-stitch all those little x's. 


Machine cross stitch is faster.  

Our instructor gave us a link (click here) to download some beautiful flower on-line cross stitch designs called "2011 Teacup Posies" prior to the class.

(color chart here)

I downloaded two designs with red flowers:  August's "Poppies" and December's "Poinsettia"...cuz ya know I love red. 


Traditionally hand cross-stitch is stitched in flat cotton threads not shiny embroidery threads.  

To prepare for the class I gathered several shades of different cotton and polyester threads in red and green from my stash.  

Some of these threads hadn't been touched in decades and were dusty and some were so old they were on "wooden" spools.
  

The design I picked…December's "Poinsettia" had 26 color changes and over 33,000 stitches.  

Between each color change you had to manually cut the thread jumps.  

And there were a lot of thread jumps...seemed like a billion.

Even though my machine's embroidery screen said the design would stitch out in about an hour it actually took several hours with changing thread colors and manually cutting all the thread jumps.

But it's still faster than hand cross-stitch! 


You need color variation on cross stitch or the design will disappear.

This happened to one of the ladies in our class who didn't follow the correct color threads chart and her design disappeared into a muddle of threads.    

Luckily I had enough color shades so my design stitched out beautifully.   

Maybe I should make another one?  

Our instructor set out a whole table of beautiful cross-stitch design packets to purchase.  

I couldn't help myself.  

I can't pass up the Christmas designs.  

I bought three of the Sudberry Christmas Classics cross-stitch packets because they included cute Santa Claus designs.
  

There are six really cute Santa Clauses that would be adorable in a quilted wall hanging.

I would have to start early to complete them!

That's all for today.  

Thanks for visiting.

Monday, April 14, 2014

Shadow Work

We just returned from a week in Ohio visiting family.

Hubby was recovering from a cold and I came down with one the evening we arrived in Ohio.
  

I was miserable the first three days there and really felt awful on the third day, Wednesday.  

I went to bed at 5 PM and didn't get up until 9 AM the next morning.  

Thank goodness that was the turning point and I slowly started feeling better each day.  

At the class

When we returned home I felt well enough to attend an Embroidery Club session on Sunday where we sewed a small sachet pocket in "Shadow Work" embroidery. 
  

We took two pieces of plain white semi sheer fabric, a piece of batting and then sandwiched colored fabrics where the embroidered leaves, flower and butterflies were to be stitched to create a "shadow" of the underlining colored fabrics. 


Yesterday was in the 80s here and today in the 70s.

The trees and shrubs are budding out.  

The house was too hot today so we turned on our new air conditioner for the first time!  

Weird!

So early to have A/C on.

Coming together nicely…sorry this is a little blurry.

Although I haven't had a chance to get out and buy some Soft Pink yarn yet, I did start joining together the rounds of my throw, Pink Delight.  

First I tried joining the squares matching the color of each round. 

That looked nice but didn't have the punch I wanted.  

So I "frogged" the join and started over using the gray yarn.  

With the gray yarn join

That was perfect!

I need to get some more Soft Pink yarn so I can finish the sixth round.

And then on to the edging.


So true…

One can hope!

Wednesday, January 8, 2014

⛄️ Holiday Hot Pad ⛄️

I thought I had blogged about this "Party with Patrick" project by Patrick Lose:

Holiday Hot Pad 


But I discovered I hadn't. 


I decided to buy the digital design (here) for the Christmas light bulb - that way the machine does all the work sewing the satin stitches.  


I added the bulb's light rays radiating out from  each light using one of my machine 's built in quilting stitches.

The back with the centered quilting design and stipple fill.

And I couldn't stop there.  

I had to add more of my touches so I stitched an embroidered quilt and stipple design on the back. 

This design came with my Janome Memory Craft 12000. 


I like the red fabric border.  

It sets the front and back off nicely.

One of the ladies in our embroidery club gave me the nicest comment:   

She said, "I should be very proud of my work.  

It was very well done and anyone would be thrilled to receive it as a gift."


It's too pretty to use. 

Today is a sew day for me.  

I'm starting the next "Party with Patrick" Christmas project - "Shining Stars".

Have I encouraged you to sew?    

I hope so.

It's a rewarding and fun hobby. 


Monday, November 4, 2013

Pumpkin Patch Table Topper


Yesterday in between doing the laundry I decided to try my hand at free motion quilting on my "Party with Patrick" November embroidery project...PUMPKIN PATCH.
   

Of course I didn't follow all my sewing machine manual's instructions for free motion quilting.  

I didn't change the switch plate nor the bobbin case.  

However, I did use the same embroidery thread in the bobbin as the top thread.
  

I was pleased to see that the tension appeared ok on the bottom with my test piece.  

So, I was good to go.  

I quilted a looping vine with a leaf pattern.  

I drew the pattern first in chalk on the fabric and followed it as best as I could for my first time free motion quilting (FMQ). 


I was surprised how quickly the free motion quilting went.  

I was done before I realized it.  

Then was time to finish her up and put on the bias binding.  

This time I wanted to sew the bias binding on the "Patrick Lose way" so I watched his video again which was very helpful.  

And it worked beautiful.  

Pumpkin Patch was done!


This morning I attended my sewing/vac store's monthly Embroidery Club where we learned how to embroider with fleece.
   

It's difficult to tell but there are two layers of stabilizer here (one under and one over this piece of minky fabric).  

December's Embroidery Club's project will be sewing up a Christmas ornament.   

I love anything with Christmas!


I changed out the picture frame of Ms. Skeleton for Mr. Turkey.   

Most of our Halloween decorations are put away. 

I just kept out ones that could also be used for Thanksgiving.  


 It's so cold here today.  

I'm looking forward to warmer weather at Walt Disney World Florida!

Source:  Pinterest

Isn't this adorable.

Now, if I have a kitty....