Pages

Sunday, June 30, 2013

A Little Hearts Bag

HEARTS !


Start with pretty white fabric printed with little red hearts.


Add an embroidered design of hearts on both sides. 

(Working on washing out the blue mark lines.)


Practice embroidering words of love.

And on the side (must multi-task) pick up a crochet hook and crochet another star design in rose and yellow....still one more round to crochet on this star. 


All embroidery done in delicious red embroidery thread. 


And I only broke one needle with this project. 

LOL !  

Friday, June 28, 2013

Girl and Boy


I can whip up one of these embroidered cosmetic bags in a day on my new Janome Horizon Memory Craft 12000 ...if I keep to a schedule.  

Embroidering the designs takes the longest time.  

Sewing up the bag is quick and easy even with a lining and zipper.   

(Sorry I haven't washed out my blue chalk line markings yet.) 

This time I chose a cute girl and boy cross-stitched embroidery figure design.  

However, trying to determine the correct thread colors has been a challenge though.  

I only have about 12 different embroidery thread colors.  

And the girl and boy figures used around 9 thread color changes each.

That's what takes time...pulling out and rethreading a new color.
  

I think I have the mirror image positioning down now.  

I picked my 9 thread colors and started sewing.  

Imagine my surprise when I realized I had  chosen yellow for the little girl's face and hands.  

Another lesson learned.  

Use the machine screen to go through the colors and their assigned areas more carefully.  

My machine only assigns Janome brand threads numbers and I don't have any Janome threads.  

It's not easy trying to match the tiny boxes of colors shown on the machine screen. 


My little boy got a pink face and hands since I don't have any flesh colored thread.  

I embroidered "girl" and "boy" above each figure but the "boy" looks more like "box" !  

LOL!

I sewed a line of decorative stitches in blue thread across the top of the bags...a spool of thread and scissors for the girl and a house and car for the boy.

I need more embroidery thread in lots of colors! 


Hubby assembled my white Ikea cabinet for me.

The drawers slide beautifully.   

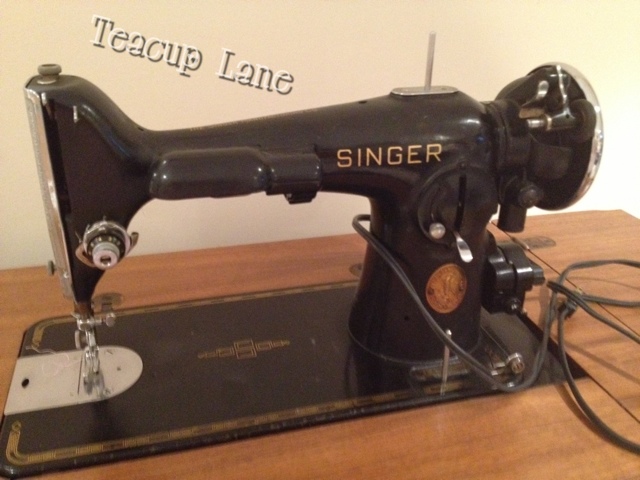
It fits nicely next to my vintage Singer 201-2 machine and No. 42 wood cabinet (which has now become my ironing station).  

Design pattern is named "Paperclips"!

You can find out anything on the Internet.  

For example, I never knew the age of my paternal Grandmother's vintage Singer sewing machine.


 I did some research the other day and I not only learned what year it was made but the actual day, the quantity and where it was manufactured ( some sources from ISMACS International Sewing Machine Collectors' Society web site):  

Source indicated my serial number Singer Sewing Machine Model 201-2 was born on February 27, 1940 in Elizabeth, New Jersey (quantity 10,000).

The Singer website said the 201-2 was manufactured (or it is possibly was the year this model number was allotted) in 1939 (here). 

It is a no fuss straight stitch sewing machine with electric motor and with reverse stitching and weighs 30 pounds!

Copy of the vintage 201-2 manual (here) if you're interested.  I still have mine! 

And it is a work horse of a sewing machine...able to sew through several thick layers of fabric with ease. 

One article entitled "The Best Sewing Machine Ever Made" made my day (here).

And here are two great reviews of this wonderful vintage machine (here) and (here).
Isn't this cute fabric!
(source:  Pinterest)

My Grandmother made many beautiful clothes with her Singer 201-2 sewing machine.  
(Source:  Pinterest)

Wednesday, June 26, 2013

Red and Blue For ME


Hi !  

It's Sandra!

I've been busy this week tweaking my sewing\craft room and sewing another little cosmetic bag in my... 

favorite patriotic colors.

RED     and    BLUE  !!! 


Hubby is putting together a cute white Ikea cabinet like this one for my sewing area and boy does it have lots of drawers for my sewing stuff.   

I can't wait to get have it in my craft/sewing room.  

I think it will hold quite a bit.  


Can you say "EMBROIDERY"?

I'm practicing...practicing and practicing!

I'm getting brave...moved this center bows and flowers embroidery design in the hoop for better placement on the bag and succeeded setting up the second duplicate design as a mirror image.

  Because this bag is a practice one it's a gift to myself!

I can live with my mistakes.

One flower isn't perfect because I didn't change my embroidery needle when I messed it up by striking my plastic embroidery hoop with my needle over and over.  That happens when you tell lie to the machine you are using a larger hoop but you really aren't.  My bad!  

And my top stitching under the zipper is all over the place.   

Hopefully the ones I sew for gifts will be better. 


In my opinion the Janome MC 12000 manual isn't printed professionally especially considering the exorbitant cost of this embroidery sewing machine. Their manual is cheaply bounded on poorer quality paper with that "spiral" binder that makes it difficult to turn the pages.  

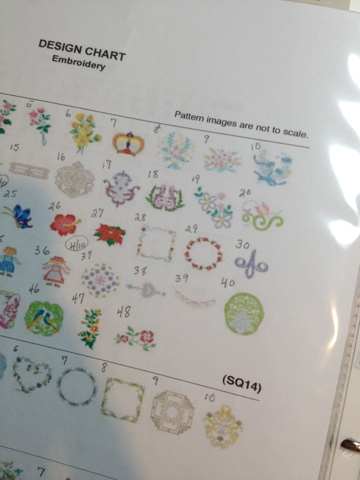
But what I really dislike is the extremely poorly printed overview - "drawings" - of the letters and designs at the back of the manual (see photo above).  

You can't tell what these designs look like they are sooooo small and fuzzy.  

You would never know what number 39 would look like looking at this overview.

It's a wonder I chose it!  

Yea..you can see the design better on the machine screen but I would still like to see it on paper when comparing designs.  


Don't get me wrong...I love this embroidery/sewing machine but...

for being the TOP of the line and newest...

 -come on Janome - 

spend some money and put out a professional looking instructional manual for this machine!
  

OK...I'm done complaining.

Back to my cosmetic bag.

This one is a little bigger than my last one (see it here).

Definitely "handmade"! 

That's why I added this cute embroidery "handmade" lettering to the lining. 


I lied...I'm not done complaining.

I want to show you a comparison between manuals printed by Janome - separated by thirty years.

My 30 year old New Home (Janome) Memory Craft 6000 - that was 1/12 the cost of my new machine - has a wonderfully printed manual on good paper with clear and detailed pictures.   You can see this manual's larger drawings of the 6000's designs in the photo above.  

Now compare it with the Janome Memory Craft 12000's manual's overview below.  
   

It may be hard for you to tell but these are soooo tiny!

And maybe if these pages had been, at least, printed on better paper they would be clearer if not still tiny.   

Just saying... 


I did read that Janome is bringing out a new Memory Craft Horizon 12000 inspiration book (read about it here). 

I'm looking forward to seeing it.   

And I pray it is a step up from the manual.

All in all this was one pretty embroidery design and I love it embroidered on my blue and white seersucker fabric in the my FAVORITE shout out red and blue thread colors.

Just to let you know that I'm sewing more (and not crocheting as much) to be prepared for the embroidery/sewing lessons I'm taking this summer.  

I joined my sewing shop's embroidery club that meets monthly and enrolled in some other classes too. 

Well, time to get back to practicing...

MORE BAGS!!! 

Thanks for visiting!  


Saturday, June 22, 2013

Another Embroidered Cosmetic Bag...


I hope you are not tired of these...

I found two striped seersucker fabrics in my stash...one beige and white and the other blue and white that are perfect to make more little cosmetic bags. 


I chose an interesting circle motif to embroider on the exterior of the bag.  

Half of the design will be one one side of the bag and the other half will be on the opposite side. 

Now I'm trying to decide if I want to add any more decorative stitches before I add the zipper.


This is a three thread color motif....dark brown (center), light beige and light green.

I'm sewing a lining out of the same striped seersucker fabric too.  

I found an excellent tutorial (here) for a similar bag with a lining to reference so I understand don't goof where to place  the three layers:  external fabric, zipper and lining.
  

Bethany's tutorial really helped me with the zipper placement when adding a lining.  

Thanks so much Sweet Bee Buzzings!


You have to make sure the zipper is open partially (so you can turn the bag inside out later) before you sew up the sides.

See...I did add a row of decorative beige leaves across the top of the bag.


And you can't forget to leave a small opening in one of the lining's sides to turn the bag inside out.

After it's turned the last step I sewed up the interior lining's side opening.

The blue chalk markings will wash off with a little water thank goodness.
  

I love the lining!


It is so cute!  

I was hoping it would be nice in case I decide to give it away as a gift.  

I'm going to make the blue and white striped one next.  

These little bags are perfect little projects to practice all of the embroidery and decorative stitches on my new Janome Horizon Memory Craft 12000.

It's great to be sewing again!

Have a wonderful Father's Day Weekend!

Thursday, June 20, 2013

Busy As A Bee..Yard and Hobby Room


Our weather has been beautiful the last few days.  

Low humidity and lots of sunshine. 

I finally planted our shed's flower boxes. 

I picked two new flowers this year.

Vinca "Catharanthus Roseus" in purples - two shades and GoldFisch "Mexican Gold".

Never heard of either of them but they are suppose to be heat tolerant.   

Although I had to take a break from the flowers yesterday when we got the call my new sewing table was here.  

Thank goodness for one ton pick up trucks!   

And a sweet Hubby to get it home and into it's new space in my sewing room.


This one was easier to move than the cutting table...146 pounds vs. 300 plus!


Tomorrow we are going to Ikea to look at storage cabinets and drawers for our hobby rooms.  

I love to go to Ikea.  


We have an old VCR storage unit in our family room that we have converted to a DVD unit.  

But it isn't sized for DVDs so I'm going to see if we can find another solution for our DVDs at Ikea. 


Still tweaking my hobby area...I still don't know how I sewed all these years without a cutting table.  

The new Horn sewing table has three manual lift positions for the sewing machine (up, level and down).  

Most of the time it will be in the raised (up) position for the embroidery arm but I like having the option to lower it to a flat (level) position or even lower.    

The blue tape outlines the area I have to keep clear for the movement of the embroidery unit.

The table is manually adjustable for height too and it has rollers.   

I'm very pleased the new sewing table fits into my space just perfectly.


Isn't our Chestnut Oak beautiful?

It's great for shade too.

Thanks for visiting!

Tuesday, June 18, 2013

More Crocheted Stars & Blogging Issues


I'm seeing more STARS!

Of course I couldn't just crochet one star.  

I had to make a garland!


These are really super easy to crochet.  

My only problem is... my stars aren't as "pointy" as the designer's.
  

I am not sure why.


But I still love them.


We've been busy the last couple days.  

We're getting ready for my new Horn sewing table.  

I cleaned out my old sewing cabinet and we brought dragged it upstairs from the basement. 

My old New Home Memory Craft 6000 sewing machine is in the shop for a "tune up". 

Believe it or not it hasn't been worked on at all for over 20 years. 

I never had a problem with it. 

It sews beautifully.

But I guess it is time to check out all the components.

The shop said there could be some rubber machine parts that can dry out over time.


I think I'm going to have to put a shelf up in my sewing room over my tables so I can mount some lights from it for task lighting. 

Well... actually hubby is going to mount the shelf and put the lighting under the shelf for me.

Pretty please...


I've also been busy researching some computer/iPhone blogging issues.  

For several months now I haven't been able to comment on blogs while using my iPhone. 

That was very frustrating...to say the least.

Because I like to blog with my iPhone Bloglovin' app. 

So last night I started researching that issue again and I actually found a solution... I think.

For now just enabling "cookies" on my phone browser seems to have done the trick.  

At least since last night I've been able to comment from my iPhone on blogs that I visit. 

That's one issue down.

The next issue is the fact that Google Friends Connect and/or Google Reader is going to be disabled on July 1 of this year. 

Well... at least that's what I understand. 

So awhile back I set up to have the Bloglovin' icon on my left sidebar of my blog for folks to click on to continue to be able to follow me.  

As I mentioned I also use the Bloglovin' app on my iPhone and I absolutely love it.

Click for a review of Bloglovin' (here) and to go to their website (here).  

It's so easy to follow the blogs I like and it's wonderful being alerted when a new posting has gone up.  

My research into Bloglovin' was fruitful too.  

I discovered that I needed to "claim" my blog.  

You can read all about that ? (here). 

That's why my post yesterday (here) just has the link to Bloglovin' - that post is the result of me "claiming" (i.e., verifying) my blog on Bloglovin'.  

The link also takes you, the reader, right to my blog on Bloglovin' to click on "follow" if you want to follow me on Bloglovin'. 


The last issue that I'm contemplating on is setting up a Facebook Fan Page for my blog. 

I found some information & instructions on how to do that (here) and (here). 

I just want to make sure that the Facebook Fan Page for my blog doesn't connect back to my Personal Facebook Profile.

Back to reading this Facebook Fan Page stuff (#%$#) and deciding if I want to take this next big step.

How about you?

Are you joining Bloglovin' and/or setting Facebook Fan Page for your blog?

If you have a Facebook Fan Page for your blog, please let me know if you like it and how it works vs. your Personal Facebook Profile.


It seems like they're always changing things. 

Once I finally get the hang of something or get it set up it changes. 

Well they always said that "change is the only constant".

Now can I get back to crocheting and sewing????

Saturday, June 15, 2013

Patriotic Crocheted Star


I found the cutest crocheted star last night.


And I mean during the wee hours of the night. 


Sometimes I have trouble sleeping. 

If I can't get back to sleep, I will grab my iPhone and blog until I get sleepy again. 


Our morning was busy filled with errands.  

After lunch I fell asleep while watching TV (I can sleep during the day...errrr...why not at night?) and woke up thinking about that little crocheted star.


I wanted to crochet one but I had a problem. 

I couldn't remember whose blog displayed the pattern.  

So I spent about 15 solid minutes looking through the blogs I follow on Bloglovin'.  

I jumped over to Ravelry but I couldn't find it there either.  


It was driving me crazy. 

I wanted to find it before the post was buried.  

Then I got lucky and found the blog - Sarah at Repeat Crafter Me.

Click over (here) for Sarah's free pattern. 

Jump over to my Ravelry page (here) for more details. 


I'm going to crochet more of them - maybe make a garland. 

How about you?

Are you game?